By Ilane Tall · Updated October 4, 2026 · Research-based.
Reader-supported: we may earn a commission when you buy through the links on this page, at no additional cost to you. It never changes which product we recommend. Prices quoted below were correct at the time of writing and move often.
The short version
A wine fridge is a sealed, humid cabinet, and what grows inside one is almost always mold or mildew feeding on moisture, not visible dirt. The cleaning that matters is a mild wipe-down, not a disinfecting scrub.
The single check most owners never do is the door gasket seal test. A gasket that has gone soft or cracked lets humid room air in, and that is what actually drives mold growth and a struggling compressor — not a dusty shelf.
The step almost everyone skips entirely is dusting the coil or front grille. It takes five minutes twice a year and it is the difference between a compressor that lasts a decade and one that works twice as hard for half as long. See the full maintenance schedule below.
What actually grows in a wine fridge, and why it's a humidity problem
Open a wine fridge that has gone a year without attention and whatever you find on the shelves or in the door folds is not dirt in the kitchen-countertop sense. There is no grease, no food residue, no crumbs. What you are looking at is almost always mold or mildew, and it got there because of the one design feature that makes a wine fridge different from every other appliance in the house: it is built to stay humid on purpose.
A kitchen refrigerator runs dry by design, typically down around 15–20% relative humidity, because dry air keeps food from growing anything. A wine fridge does close to the opposite. Cork is a natural material that needs moisture to stay swollen and sealed against the bottle neck; let the air around a cork dry out and it shrinks, air creeps in, and the wine oxidizes early. So wine fridges are engineered to hold considerably higher humidity, and that same moisture is exactly what mold and mildew need to establish themselves on anything organic they can reach — a wine drip on a shelf, dust that settled weeks ago, cork dust, the paper label glue on a bottle that got wiped with a damp cloth and put back wet.
Three spots inside the cabinet collect that moisture more than the rest, and they are the three places worth checking first:
- The door gasket folds. Rubber or vinyl gaskets are corrugated so they compress evenly, and every fold is a place where condensation can sit without ever fully drying, because the cabinet almost never opens to dry air the way a kitchen fridge does several times a day.
- Wood shelves. Wood is porous. A splash of wine or a few weeks of ambient humidity and a wooden shelf can hold enough moisture at its surface to support mildew, especially if it never gets fully dry between cleanings.
- The bottom tray or drip channel. Compressor units pull moisture out of the air as part of cooling it, and that condensate has to go somewhere — usually a small collection channel or tray near the bottom of the cabinet. Left unchecked, that is standing water sitting in the dark for months.
None of this means the humidity itself is a mistake to fix. It is doing its job. The point of this section is simpler: stop thinking of wine fridge maintenance as "cleaning," which implies dirt, and start thinking of it as moisture management, which is what it actually is. Every step below follows from that one reframe.
Cleaning the interior and shelves without leaving a smell behind
The biggest mistake in cleaning a wine fridge is using the kind of cleaner that works perfectly well on a kitchen counter. A sealed cabinet of one to three cubic feet does not behave like an open kitchen. Any strong scent — bleach, ammonia, a heavily perfumed all-purpose spray — has nowhere to go. It sits in that small, enclosed volume, and because cork is permeable, a wine fridge that smells faintly of cleaning product after a wipe-down will, over the following weeks, start transferring a trace of that smell straight through the corks into the wine. This is the reason "deep clean" and "disinfect" are the wrong instincts here.
What actually works is close to the mildest option available: a solution of about a tablespoon of baking soda per quart of warm water, or a well-diluted white vinegar solution, applied with a soft cloth rather than sprayed directly onto the interior. Both lift the kind of light mildew film described above without leaving a lingering chemical smell, and both are safe on the interior plastics and most shelf materials.
- Pull the shelves out rather than wiping around them. Every shelf — wood or wire — cleans faster and more completely out of the cabinet, and pulling them gives you a clear look at the back wall and the floor of the cabinet, where moisture collects first.
- Wash wood shelves in the sink with the same mild solution, then dry them completely with a towel and let them air-dry the rest of the way before putting them back. A damp wooden shelf slid back into a humid cabinet is the single fastest way to restart the mold cycle you just interrupted. Wire shelves are far more forgiving and dry almost immediately.
- Wipe the interior walls and the bottom tray or drip channel with the same cloth, paying particular attention to any corner where you can see residue or a dull film — that film is the mildew described above, and it comes off easily while it is still thin.
- Dry everything with a clean, lint-free cloth before closing the door. This is the step that actually matters more than the cleaner you used. Leaving behind a damp interior, even one that is now free of visible residue, hands the humidity straight back to whatever spores are still airborne inside the cabinet.
- Leave the door open for fifteen to twenty minutes before restocking, so any trace of cleaning-solution vapor has somewhere to go besides into the corks of the bottles you are about to put back.
One point worth being direct about: you do not need to unplug the fridge for a routine wipe-down. A quick pass with a damp cloth while the unit keeps running is fine. Save the full shelf-out, door-open clean for the twice-a-year pass described in the schedule below, when you have time to let everything dry properly rather than rushing to close the door and protect the temperature inside.
The door gasket: wipe it down, then check the seal
If one part of a wine fridge deserves more attention than it gets, it is the gasket — the rubber or vinyl strip that runs around the inside edge of the door. It is also the part most people never think to look at until the cabinet is already struggling to hold its setpoint.
Cleaning it is simple. Wipe the gasket with the same mild baking-soda or diluted-vinegar solution used on the interior, getting a cloth or a cotton swab into the folds themselves rather than just skimming the surface — that is where the mildew described earlier tends to start, because the folds trap moisture longer than a flat surface does. Avoid alcohol-based or petroleum-based cleaners on the gasket specifically; they are harder on rubber over repeated use and can dry it out, which is the opposite of what you want from a part whose entire job is staying flexible enough to compress evenly.
Checking the seal is just as simple, and it is the step that tells you whether the gasket is actually still doing its job. Close the door on a strip of paper or a dollar bill so that about half of it is inside the cabinet, half hanging out, then pull gently. A gasket that is sealing properly grips the paper with even, firm resistance all the way around. If it slides out with little to no resistance at one or more points, the seal has gone soft or compressed in that spot and room air is getting in there. Repeat the test at four to six points around the door — top, bottom, both sides and the corners — since a gasket can fail unevenly rather than all at once.
Why this matters more than it sounds: a failing gasket does not announce itself. It lets in warm, humid room air a little at a time, which means the compressor runs longer to compensate, the interior swings further from its setpoint than the display suggests, and the extra moisture coming in from outside is exactly the kind of humidity spike that restarts the mold problem in the first section — on a shelf you just cleaned.
If the paper test fails in multiple spots, or if you can see visible cracking, permanent flattening, or a gap when the door is closed, the gasket needs replacing rather than cleaning — most manufacturers sell the gasket as a standalone part. It is also worth checking gasket contact any time a door has been rehinged, since a reversible door that was not reseated correctly after a hinge swap can press unevenly against the frame even with a perfectly good gasket, which looks identical to a failing seal until you know to check the hinge side specifically.
Dusting the condenser coil or front grille — the step almost everyone skips
Every compressor wine fridge has to move the heat it pulls out of the cabinet somewhere, and that happens at a coil, exposed to room air so it can shed heat efficiently. Where that coil sits depends on how the fridge is meant to be installed, and that distinction matters because it changes where you need to look.
Freestanding units reject heat through a coil on the back or sides, which is also why freestanding models need clearance behind and beside them rather than being pushed flush against a wall or boxed into a cabinet — our ventilation and placement guide covers the exact clearance numbers. That rear coil collects dust, pet hair and, in a kitchen, airborne grease, all of which coat the fins and reduce how efficiently they shed heat.
Built-in units vent the same heat through a grille on the front instead, specifically so they can be enclosed in a cabinet run without suffocating. The grille is easier to reach than a rear coil, but it is also easier to forget, since it blends into the cabinetry and never looks obviously dirty from a glance.
In both cases, the fix is the same: unplug the unit, and use a vacuum with a soft brush attachment or a long-handled coil brush to clear dust and lint from the fins or grille slats. Do not use water or a damp cloth anywhere near the coil or the electrical components behind a grille. A build-up of dust acts as insulation on a part whose only job is shedding heat quickly, which forces the compressor to run longer and harder to hit the same setpoint — worse cooling, more electricity, and a shorter compressor life, all from a part nobody sees.
This step gets skipped more than any other in this guide for one simple reason: it is out of sight. A dirty shelf is visible every time you open the door; a dusty coil is not. Twice a year is a reasonable baseline, and more often than that if the fridge sits in a kitchen with regular cooking grease in the air or shares a room with a pet. If your cabinet runs on compressor cooling, this step applies to you; thermoelectric units have no compressor and no coil to dust, which is one of the few genuine maintenance advantages that cooling type has over the other.
The picks used in this guide
Three real wine fridges, used above to make the maintenance points concrete rather than abstract. None of this is a buying recommendation on cooling power or capacity — it is specifically about what each one tells you about cleaning and upkeep.
01Freestanding, smallest footprint
Feelfunn 12 Bottle Wine Cooler
The clearest example of a rear coil to dust
12 bottles·Freestanding·Black
This listing states plainly that it is a freestanding wine fridge, which means it rejects heat through the back or sides rather than a front grille — exactly the configuration described in the coil-dusting section above. At twelve bottles it is small enough that pulling it away from the wall for a twice-a-year dusting pass is a two-minute job rather than a project, which makes it a reasonable way to practice the habit before a larger cabinet makes it mandatory.
Small enough that there's no excuse to skip the coil.
0215", 33 bottle
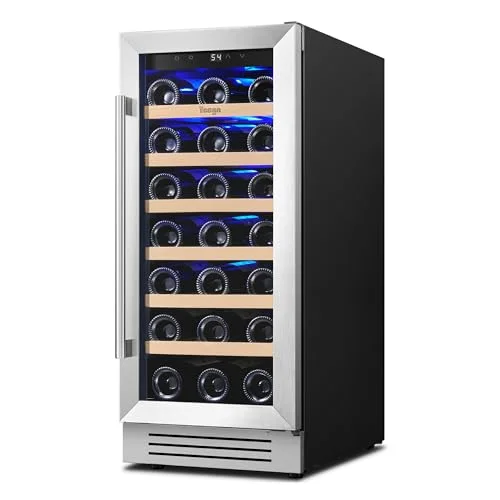
Yeego 15" Wine Fridge, 33 Bottle
Check the listing before you assume built-in or freestanding
33 bottles·15-inch
At 15 inches and 33 bottles, this sits in the size bracket where both built-in and freestanding versions are common, and the listing title alone doesn't settle which this one is. That's exactly the situation the coil section above is for: before you decide whether you're dusting a rear coil or a front grille twice a year, confirm the installation type on the product listing rather than assuming. Getting that wrong is also how a freestanding unit ends up enclosed in a cabinet with nowhere to vent, which is a faster way to end a compressor's life than a dusty coil ever is.
The one spec worth confirming before you clean anything.
0315", 33 bottle, glass door
Yeego 15" 33 Bottle Glass Door
The easiest door to spot a failing gasket on
33 bottles·15-inch·Glass door
Same size and capacity as the model above, but this listing specifies a glass door rather than leaving the material unstated. A glass door makes the gasket paper test easier to combine with a visual check, since you can see the gasket's condition and any condensation building up along the frame without opening the cabinet at all — a small practical advantage when you're trying to make the twice-a-year gasket check an actual habit rather than a chore you forget.
You can see the gasket before you ever have to test it.
A realistic maintenance schedule: monthly, twice a year, never
Most of the advice above sounds like a lot until it's organized by how often it actually needs doing. In practice, wine fridge maintenance fits into three honest buckets.
Monthly
A quick look, not a project. Wipe up any obvious spill or drip on a shelf before it dries into a film. Glance at the bottom tray or drip channel for standing water. If the fridge has a glass door, look at the gasket line for visible condensation or a cloudy film while you're already standing there reaching for a bottle — this costs nothing extra if you're paying attention, and it's how a developing problem gets caught at the "wipe it with a cloth" stage instead of the "replace the gasket" stage.
Twice a year
The real clean. Pull every shelf and wash it properly, dry it completely, and let it air out before it goes back in. Run the paper or dollar-bill test around the door gasket at four to six points. Unplug the unit and dust the rear coil or front grille with a soft brush or vacuum attachment. Do all three in one sitting — roughly twenty minutes, twice a year, which is genuinely the entire maintenance commitment a wine fridge asks for.
Never
There is no filter to change — unlike a kitchen fridge with a water or ice dispenser, a wine fridge has no filter cartridge on any kind of replacement schedule. There is no manual defrost cycle to run on a schedule either; frost that does build up on an evaporator is wiped away during the twice-a-year clean, not on its own calendar. Skip bleach and strong disinfectants entirely — they solve a dirt problem this appliance doesn't have, and they're more likely to damage a rubber gasket or leave a smell that migrates into the wine than to do anything useful. And there is no reason to unplug a full cabinet for an extended period outside of the deep clean itself; the humidity and temperature stability that protects the wine depends on the unit running continuously, not on periodic rest.
How we put this together
This guide is built from how compressor refrigeration and humidity-retentive sealed cabinets behave in general — the same physics and material science that govern any appliance holding a stable temperature and elevated humidity behind a gasketed door — combined with the published size, capacity and installation details for the three products named above. Where a listing didn't specify a detail, such as installation type for the Yeego 15" 33 Bottle, we said so rather than guessing at it.
We do not run a testing lab, and we have not physically cleaned or disassembled these specific units ourselves. We do not publish invented scores, star ratings or review counts for any product on this site — the retailer API doesn't return that data for this category, and we don't fabricate sentiment we have no source for. What's in this guide is general, well-established maintenance practice for sealed, humid, compressor-cooled cabinets, applied honestly against real products with real published specifications.
Frequently asked questions
How often should I clean a wine fridge?
A quick monthly check for spills and a glance at the gasket and drip tray is enough day to day. The real clean — shelves out, washed and dried, gasket seal-tested, coil or grille dusted — only needs doing twice a year. Nothing about a sealed wine fridge needs weekly or even monthly deep attention.
Can I use bleach or vinegar to clean the interior?
Skip bleach. In a small sealed cabinet the smell has nowhere to go, and because cork is permeable it can transfer a trace of that smell into the wine over time; bleach can also dry out and crack a rubber gasket with repeated use. A well-diluted white vinegar solution or a tablespoon of baking soda per quart of warm water, applied with a soft cloth and dried thoroughly, handles the mild mildew film a wine fridge actually gets without leaving anything behind.
How do I know if my door seal has failed?
Close the door on a strip of paper or a dollar bill so half hangs outside, then pull gently. A good seal grips it with firm, even resistance. If it slides out easily at one or more of several points around the door, the gasket has gone soft or compressed there and needs cleaning at minimum, replacement if it's visibly cracked or flattened.
Do I need to dust a coil if my wine fridge is thermoelectric?
No — thermoelectric units have no compressor and no refrigerant coil, so there's nothing to dust in the sense described in this guide. They still have vents that can collect dust over time and are worth a visual check, but they skip the coil-maintenance step entirely, which is one of the few genuine upkeep advantages thermoelectric cooling has over compressor cooling.
Written by Ilane Tall. Research-based comparisons of published specifications, current prices and general compressor-refrigeration behavior — we do not physically test these units and we do not publish invented scores.