By Ilane Tall · Updated September 26, 2026 · Research-based.
Reader-supported: we may earn a commission when you buy through the links on this page, at no additional cost to you. It never changes which product we recommend. Prices quoted below were correct at the time of writing and move often.
Quick answer
Wine fridges fail from bad placement in two opposite ways, and the fix depends on which type you own. A rear-venting freestanding unit rejects heat out of its back and sides, so it needs roughly 3–5 inches of open air behind it and 1–2 inches on each side — pushed flush against a wall, its compressor overheats and runs itself to death. A front-venting built-in does the opposite: it is designed to sit flush on three sides inside a cabinet, and instead fails when something blocks the grille at the bottom front.
Check the listing or the owner's manual before you decide where the unit goes — "freestanding," "built-in," and "built-in or freestanding" each imply a different venting design, and getting that one word wrong is the single most common expensive mistake in this category. Jump straight to the five-minute pre-purchase checklist if you already know your space is tight.
Rear-venting or front-venting — how to tell which one you own
Every wine fridge with a compressor has to reject the heat it pulls out of the cabinet somewhere. There are only two places that heat can leave the appliance, and which one your unit uses decides everything about where it can live.
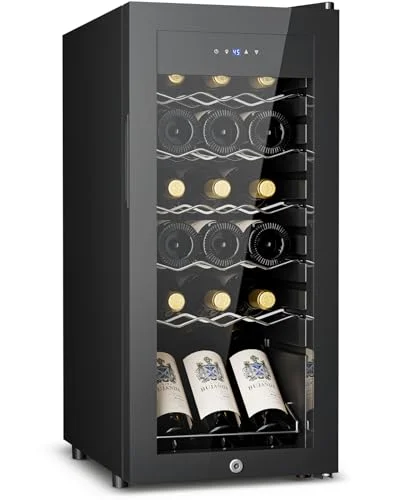
Rear-venting is the older, more common design. The condenser coil and the fan sit at the back of the cabinet, sometimes wrapping partway around the sides, and the unit draws room air in and pushes hot air back out behind and around itself. This is the design used by almost every unit sold plainly as "freestanding," including the Feelfunn 18 Bottle in this guide — it is described by the manufacturer as a freestanding wine cooler, which is the listing's way of telling you the heat has to leave from the back and sides, not the front.
Front-venting is the newer design built specifically to make cabinet installation possible. The condenser and fan are mounted low at the front, usually behind a grille or a removable kickplate, so the unit draws in room air and exhausts it from the same face it presents to you. This is what lets a manufacturer rate a unit as "built-in" — a design that vented from the back could never be sealed into a cabinet on three sides and survive, so if a listing says built-in at all, front venting is implied.
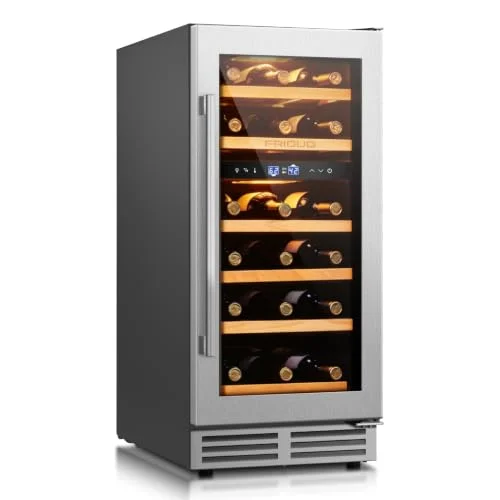
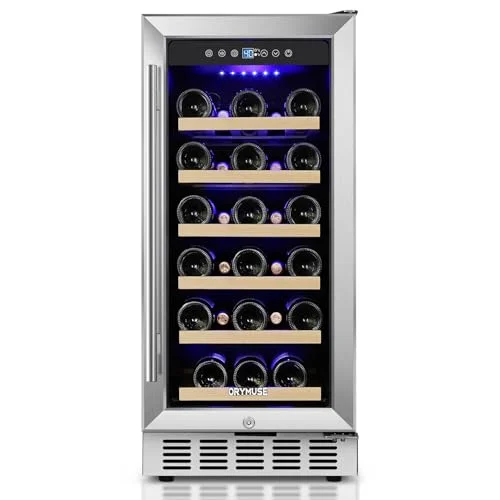
That logic also explains why some units are rated for both installations. The ORYMUSE 15 Inch in this guide is listed as built-in or freestanding, which only works because its venting is at the front: a front-venting unit can always stand freely in the open with room to spare, but a rear-venting unit can never be safely enclosed. If a product page ever advertises "built-in or freestanding," read that as a built-in-capable, front-venting design that happens to also work in the open — not the reverse. The Friduo 15 Inch, sold specifically as a built-in dual zone unit with a seamless stainless door meant to sit flush with surrounding cabinetry, is the same front-venting family.
If you already own the unit and the listing language is ambiguous, look at the appliance itself. Pull it out and check the back: a solid, closed rear panel with grille slots or a black condenser fin visible near the top or bottom means rear-venting. A front-venting unit will have its grille or ventilated kickplate at the very bottom front, usually below the door, and the back panel will be flat and fully enclosed because it does not need to breathe. The owner's manual will also state a clearance requirement — if it lists inches for the back and sides, treat it as rear-venting regardless of what the box calls it.
The rear-venting freestanding unit: why "flush against the wall" cooks the compressor
A freestanding wine fridge is built assuming there is room air behind it for the compressor to draw on. Push it flush against a wall, into a corner, or into an alcove sized for the cabinet and nothing else, and that air stops moving. The condenser fan recirculates the same warm pocket of air across the coil instead of exchanging it for cooler room air, so the coil never sheds heat the way the engineer designing the unit assumed it would.
The unit does not fail immediately, which is exactly what makes this the mistake people don't connect to its cause. What actually happens is a chain: the condenser runs hotter, which raises the refrigerant pressure, which makes the compressor work harder to hit the same setpoint, which makes the compressor run longer and hotter on every cycle. A compressor rated for intermittent duty spends more of its life running instead of resting. Compressors fail from heat and duty cycle, not from age on a calendar, so a unit denied its clearance for a year can fail the same way a unit given proper clearance fails after five.
Manufacturers publish clearance numbers precisely to prevent this, and while the exact figure varies by model — always check the specific number in your unit's manual rather than assuming — a useful planning range for a compressor-cooled freestanding wine fridge is roughly 3 to 5 inches of open air behind the cabinet and 1 to 2 inches on each side, with the top left unobstructed as well if the unit vents upward. The Feelfunn 18 Bottle, at a compact 18-bottle freestanding footprint, is exactly the size of unit people are tempted to wedge into a gap between a cabinet and a wall because it looks small enough to fit anywhere — it is also exactly the size where a few inches of missing clearance is easy to lose track of, because the cabinet itself barely leaves room to notice.
The test that matters more than a tape measure: put your hand behind the running unit after an hour. If the air coming off the back is noticeably hot rather than warm, or if you can feel it is not moving at all, the clearance is not doing its job — regardless of how many inches you measured when you set it up.
Side clearance is easy to shortchange for a different reason: it is rarely visible once the unit is in place, tucked next to a cabinet run or another appliance. A narrow side gap still lets air recirculate if the top and back are open, but a unit boxed in on three sides — back, and both sides — behaves like an enclosure even if nothing is technically touching it, because the air has no path in or out. Our guide to wine fridges under 20 bottles for small spaces covers the compact freestanding units people most often place this way, and the placement rule does not relax just because the appliance is small.
The front-venting built-in: the opposite failure — a blocked grille
A front-venting built-in unit is engineered for the situation that kills a freestanding one: flush contact on the back and both sides inside a cabinet run. That is the entire point of the design, and it is genuinely safe to install that way — assuming the one part of the appliance that still needs airflow is left alone.
The failure mode here is the mirror image of the rear-venting case. Instead of the back overheating, the front grille or ventilated kickplate gets blocked, and the result is the same starved compressor and the same shortened life, just caused from the opposite direction. This happens in a handful of predictable ways: a decorative kickplate or trim piece installed over the vent without matching cutouts, a rug or a pet bed pushed up against the base of the cabinet, a drawer or cabinet door below the unit that swings closed against the grille, or — the one installers see constantly — a cabinet opening cut to the unit's width but not its depth, so the door of the unit sits proud of the surrounding cabinetry and gets nudged back until the vent is compressed against the cabinet face.
Rear-venting freestanding
Needs open air behind and beside it. The mistake: pushing it flush against a wall or into a tight alcove. The fix: 3–5 inches back, 1–2 inches each side, nothing built in around it.
Front-venting built-in
Needs an unobstructed grille at the bottom front. The mistake: trim, rugs, or a misaligned cabinet cutout pressed against that grille. The fix: leave the manufacturer's stated front clearance completely clear, always.
The practical rule for a front-venting installation: whatever clearance the manufacturer specifies in front of or below the grille, treat it as non-negotiable, and never assume a "built-in" rating means zero clearance anywhere. It means the sides and back can be flush; it does not mean the entire appliance is exempt from needing air. The Friduo 15 Inch, built specifically for a seamless flush look in a cabinet run, depends on that front airflow path even more than a typical built-in because its whole design premise is disappearing into the surrounding cabinetry — which is exactly the installation where it is easiest to accidentally trim away the one gap that has to stay open. Our undercounter installation guide and built-in vs freestanding comparison go deeper on getting the cabinet opening itself right before the appliance ever arrives.
Confirm the venting direction and the exact clearance figures in the specific unit's installation manual before cutting any cabinetry — a plywood mockup of the opening, tested with a tape measure against the manual's numbers, costs an afternoon and prevents a cabinet rebuild.
Ambient heat sources that undo good clearance
Clearance solves the airflow half of the problem. The other half is what temperature that air is to begin with, and this is where an installation can follow every clearance rule on the page and still underperform, because the compressor is now fighting the room as well as the cabinet.
- Direct sun. A window that puts afternoon sun directly on the cabinet — especially a unit with a glass door — raises the skin temperature of the appliance and forces the compressor to work against that added heat load continuously, not just during the hottest part of the day. Glass-door units are worse off here because sunlight passes straight through to the bottles and the interior air, not just the exterior housing.
- A range or oven. Placing a wine fridge in the same run of cabinetry as a range puts it next to the single largest intermittent heat source in most kitchens. Even with a thermal break between appliances, radiant heat from an oven during a long roast raises the ambient temperature the wine fridge has to cool against, and that effect compounds with whatever clearance issue already exists.
- A dishwasher vent. Dishwashers exhaust warm, humid air during the dry cycle, and a wine fridge positioned directly beside or above that vent path takes in air that is both hotter and more humid than the rest of the room — a bad combination for a compressor trying to hold a stable setpoint and for a door seal trying to keep condensation out.
None of this means a wine fridge can never go in a kitchen — most of ours do. It means the placement decision should weigh the whole run of cabinetry, not just the opening's dimensions. A few feet of separation from a range, and a spot out of direct afternoon sun, does more for the compressor's working life than any amount of extra clearance behind a unit that is already baking in a sunbeam. For units running compressor cooling in a warm kitchen to begin with, our compressor-only wine fridges guide covers the units built to handle ambient heat in the first place — placement still matters even for those.
What a bad clearance decision looks like six months later
Ventilation problems rarely announce themselves on day one. A compressor under strain still cools the cabinet at first; it just works harder and runs longer to do it. The signs show up gradually, and they show up around the door before they show up as an outright failure.
The earliest sign is usually condensation on the inside of the glass or around the door gasket, particularly near the top of the door where warmer air collects. A compressor fighting a heat load it cannot shed runs in a way that pulls more moisture out of the air on each cycle than it can steadily manage, and that moisture ends up condensing wherever the temperature differential across the door is greatest — the seal and the glass. A small amount of fogging on a cold day is normal; a gasket that stays visibly wet, or beads of water that collect at the bottom of the door track, is not.
Next comes the gasket itself losing its seal. A door seal maintains its shape through consistent, moderate temperature cycling; a compressor running longer and harder puts more mechanical stress on the whole system, including the door switch and hinge alignment, and a gasket exposed to repeated condensation can soften, distort, or start growing a faint mildew smell at the seam. Once the gasket stops sealing evenly, the cabinet loses cold air every time the compressor rests, which means the compressor runs even more to compensate — the same problem compounding on itself.
The last sign, and the one that finally gets noticed, is a cabinet that runs measurably warmer than its setpoint despite the compressor sounding like it never stops. At that point the unit has likely been running under strain for months, and a service call or a replacement is usually the outcome, not a fix. Checking the actual internal temperature against the display — with a separate thermometer, since the display reads its own sensor, not necessarily the shelf where your best bottle sits — is the fastest way to catch this before a compressor gives out entirely. If a unit is already showing these signs, our wine fridge not cooling checklist walks through diagnosing it before assuming the compressor itself has failed.
The three units in this guide, and how each one vents
These are the only products referenced in this guide, chosen because together they cover both venting designs and both the freestanding and built-in installation paths discussed above.
01Rear-venting freestanding
Feelfunn 18 Bottle Wine Cooler Refrigerator
Needs open air behind and beside it — never enclose it
18 bottles·Freestanding·Black
Sold plainly as a freestanding wine cooler, which means it rejects heat from the back and sides. Its compact footprint makes it a natural fit for a narrow kitchen gap or a spot beside a cabinet run — exactly the placements where clearance is easiest to shortchange. Give it open air behind and to each side and it has nothing else standing in its way; wedge it into a tight alcove and the compressor pays for it.
A small unit still needs its full clearance — size does not exempt it from the airflow rule.
02Front-venting, seamless built-in
Friduo Wine Cooler & Fridge Freestanding, 15 Inch Built-In Dual Zone
Designed to sit flush in a cabinet run — the grille at the bottom front must stay clear
28 bottles·Dual zone·Seamless 15-inch
Built for a seamless stainless steel look flush with surrounding cabinetry, which is a front-venting design by necessity — a rear-venting unit could not be finished this way. The trade is that the front ventilation path becomes the only place air can move, so a cabinet opening cut to the door's width but not its stated clearance, or trim installed over the vent, defeats the entire point of the design.
The more seamless the installation looks, the more the front clearance is doing all the work.
03Front-venting, either installation
ORYMUSE 15 Inch Wine Cooler Under Counter
Rated for built-in or freestanding — the "or" is the tell that it vents from the front
15 Inch – 30 Bottle / 3.1 cu.ft·Digital temperature control
Rated for either installation, which is only possible with front venting: a unit that rejected heat from the back could never be rated safe for a sealed cabinet. That flexibility is genuinely useful if you are not sure yet whether it will live under a counter or out in the open, but it does not remove the front-clearance requirement in either case — check the manual for the stated grille clearance regardless of which way you install it.
Flexible installation, not zero installation requirements.
The five-minute pre-purchase checklist
Do this before you order, not after the box arrives. It takes less time than reading the listing's Q&A section.
- Measure the actual opening — width, depth, and height — where the unit will live, not the nearest round number. A stud, a baseboard, or a slightly out-of-square cabinet can eat an inch you were counting on.
- Decide freestanding or built-in first, then shop. Choosing the appliance before confirming which installation your space allows is how a rear-venting unit ends up wedged into a cabinet.
- Read the listing for the word that matters: "freestanding" means rear or side venting and needs open air on those faces; "built-in" or "built-in or freestanding" means front venting and needs the front grille left clear.
- Find the manufacturer's stated clearance in the manual or product page and treat it as a minimum, not a suggestion — round up if your measurement is close to the line.
- Scan the surroundings for heat — a window with direct sun, a range, a dishwasher vent — and shift the planned spot a few feet if any of them share the same run of cabinetry.
- Check the power outlet location relative to the clearance zone; running a cord through the required airflow gap defeats the clearance you just measured.
How we compared this — and what we can't tell you
We compared the published installation type, capacity and price for each unit named in this guide against general refrigeration principles governing compressor heat rejection — the same physics that applies to any compressor-cooled appliance, not a spec unique to any one product. Where a manufacturer states an exact clearance figure for a specific model, that number belongs in its own manual, not in a general guide like this one; we have given planning ranges drawn from common industry practice and told you plainly where you need to check the specific unit's documentation instead.
We do not run a testing lab. We have not physically installed these three units in a cabinet to measure airflow ourselves, and we do not publish an invented clearance number dressed up as a measurement. What we can do honestly is explain how compressor cooling and heat rejection work, read what each listing states about its installation type, and tell you which questions to ask before you cut a hole in your cabinetry.
Frequently asked questions
How much clearance does a freestanding wine fridge need behind it?
A commonly specified range for compressor-cooled freestanding units is roughly 3 to 5 inches at the back and 1 to 2 inches on each side, though the exact figure varies by model and is always stated in the unit's own manual. Treat the manual's number as the minimum, and round up if you are unsure.
Can I built-in a freestanding wine fridge if I just leave a small gap?
No. A rear-venting unit needs a moving path for air in and out, not just a gap. A small opening at the front of an otherwise enclosed cabinet does not let the hot air behind the unit escape or fresh air reach the condenser, so it behaves like a sealed box even though it is not technically airtight. Only a unit rated by the manufacturer as built-in — meaning it vents from the front — belongs in an enclosed cabinet.
How do I know if my wine fridge is front-venting or rear-venting?
Check the listing or manual for "freestanding" versus "built-in." If that language is missing or ambiguous, pull the unit out and look: a grille or visible condenser coil on the back panel means rear-venting, while a grille or ventilated kickplate at the very bottom front, with a solid enclosed back, means front-venting.
What are the warning signs that my wine fridge's placement is wrong?
Persistent condensation on the door glass or gasket, a gasket that feels damp or looks distorted at the seams, a faint musty smell near the door seal, and a compressor that seems to run continuously without the cabinet reaching its setpoint. Any of these six months into ownership is worth checking against the clearance the manual specifies before assuming the appliance itself is defective.
Written by Ilane Tall. Research-based comparisons of published specifications, current prices and verified owner reviews — we do not physically test these units and we do not publish invented scores.